Thursday, July 5, 2018

Kindergarten Venetian Landscapes


Kindergarten students nailed these mixed media paintings of Venice.  This two day project was a great way to practice tracing, cutting and gluing while also giving students a chance to use paint.  Who doesn't love that?

The first thing I had kinders do was watch a <i> Mati and Dada</i> episode about Canaletto, an artist who painted detailed pictures of Venice.  These Mati and Dada episodes are absolutely fabulous resources for kindergarten students.  They are fun and colorful and also very informative.  Not every episode is available in English unfortunately, but the ones that are translated are great.  
You can find this video here.


Below are some of Canaletto's paintings:


As the students are learning about 1700's Venice I set up their works space.  The first thing students do is trace and cut buildings.  The tracers we use look like this:

As students cut out buildings they will start to glue them on to their horizon line.  I fold their 12" X 18" papers ahead of time.

Students will then rotate their tracers underneath the horizon line to create the reflection of each building. It's great practice for symmetry. 

When students have neatly finished all of their buildings, use blue crayon for the sky and watered down blue paint for the reflection.

Happy creating!


Monday, July 2, 2018

First Grade Woven Animals


These are without a doubt one of my favorite projects I've done with my first graders.  Every winter I return to it and it's a hit.  I mean, how cute are these animals wearing sweaters?

Like most of the art projects I do with first graders, this one is based off of a book:

Extra Yarn is a fantastic read about kindness and individuality.  The story is fun and engaging and the excellent Jon Klassen brings it to life with his soft indie style.  We use the above picture, the animals, as our inspiration.

First provide students with the template below:
Students will place a dot of glue on each 'G'.  They will then carefully glue down strips of paper vertically to make their warp:

And then use an 'under-over'under' pattern to create their weft:

Continue weaving, pushing paper upwards to cover white spaces and gluing edges down until your animal's sweater is finished:


It's now time to make your animal!  I like to have students mix different shades of browns and tans to make painted paper beforehand.  It really gives these projects a handmade feel similar to Klassen's illustrations.  Plus, what kid doesn't want to mix paints?

Tracers we used:


You can adapt this into a one day, mess free project by making the paper smaller and omitting the painting step like the dog above.
And there you have it!  This project can be easily be adapted to use actual yarn if you happen to have some.  Happy creating!


Thursday, June 28, 2018

Second Grade Book Paintings and an Intro to Perspective


Many of my students like to read. Many of them like to draw. Why not combine the two? This painting project was such a success with my second graders last year-it served as a fitting introduction to perspective and used a shape they are studying in math, the parallelogram. It also gave them a chance to use their imagination and express their interests, hobbies and personalities, which is always important in art! Keep reading for some tips on how to teach this sometimes confusing concept.

Before we began we learned a little about my all time favorite artist, Vincent Van Gogh. Students learn a lot more about him when they see me the following year in third grade - this is merely a brief introduction to him. His still life Blossoming Almond Branch in a Glass with a Book serves as our inspiration:

Step 1: Trace the parallelogram.

Yes, students start off with a tracer. Drawing a neat, symmetrical parallelogram at this age is very difficult at this age and even the most artistic kids struggle with this, leading to a lot of initial frustration early on. Giving students a tool to begin with helps their confidence and encourages them to really get into this project. Be sure not to miss the opportunity here to make connections to math! I like to talk to students about the number of angles on this shape and where the parallel lines are. They LOVE showing off their math knowledge to their art teacher!

Make sure students trace their parallelogram pointing towards the bottom of the page.

Step 2: Flip

Flip it over and trace neatly to make the book's other side.

Step 3: Finish the form

This step can be tricky. Have students line their ruler up with the middle vertex. They will draw a dot about 2.5 inches up. Students will then finish the form of their book by connecting this dot with each outer vertex. (Sounds complicated, I know. It's not!)

Step 4: Pages
Draw several parallel lines to create pages.

Step 5: Draw the desk

Step 6: Add a cover, title, and details!
This is where students get creative! I required students to draw at least two other items on the desk with their book. Some drew vases, cups, mugs, or even phones. We had been practicing with still life drawing for a previous project, so this step was easy for them.

This student replicated a Van Gogh painting on his cover. I LOVE this idea.
This student illustrated Harry Potter and the Order of the Phoenix! How cute is that phoenix?

Here's a handout of all the steps:

To download these resources for absolutely free, visit my product listing at my Teachers Pay Teachers Store here.

And there you have it! Happy creating!


Wednesday, June 27, 2018

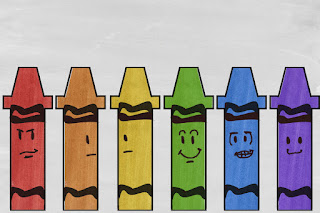
Color Mixing and The Day the Crayons Quit

Who doesn't love a fun way to teach primary and secondary color mixing? My first graders practiced their skills by creating these paintings inspired by one of my all time favorite books, The Day the Crayons Quit. It was a huge success and really let students' personalities shine through!

Step 1: The Book


One of the reasons I love this lesson so much is that it gives me a good reason to read The Day the Crayons Quit. Drew Daywalt's story about crayons fed up with their working conditions is full of clever jokes, groan inducing puns, and very colorful characters (literally). It's also broken up into sections based on the character speaking, so it's perfect for reading in chunks. I cannot recommend it enough!
Step 2: The Lines


Next, students will draw six crayon outlines on a piece of 12" X 18" paper. I give them a tracer for this and instruct them to start way at the left of the paper so that each crayon fits. (Yes, I know, tracers can be a divisive issue in art education...I'm not a huge fan of tracers and I don't often use them, but I feel like it's okay for this project because the goal here is to learn color mixing, not drawing).
(This is the actual tracer that I use. It's perfectly sized for 12" X 18" paper.)
Step 3: Primary Colors

Once students have neatly traced their crayons it's time to paint primaries! Have students paint their red, yellow, and blue crayons in the appropriate spaces.
Step 4: Secondary Colors

Once primary colors have been painted it's time for the real fun! Students will begin to mix and paint the orange, green, and purple crayon. I like to leave a color mixing anchor chart on my easel and have students reference it. They really learn when they experiment on their own or with a classmate.
Step 5: Personality!

The following art class will have students adding their original details. Encourage creativity! Students can add faces but I don't require it if they don't want to. I do, however, mandate that students use black to make their shapes look more like a crayon.
Faces can be fun!


Welcome to Elementary, My Dear Artists

Hello and welcome to my art education blog! My name is Ms. Spero and I am thrilled to share some lessons, activities, and resources with other teachers. Before I begin, though, let's get a few things out of the way:

Why start a blog?
Art is an incredible subject to teach. It is layered, varied, and incorporates multiple disciplines within it. Art is also less formally regimented than the core academic subjects, which means that art teachers (and music and phys ed as well) have a bit more creative freedom in how they approach their curriculum. Due to this flexibility art teachers have been known to come up with all sorts of wonderful, unique lesson ideas, and blogging is a great way to share those ideas. When I first began teaching I remember using the resources on these blogs to help get me started. I hope to do just that with upcoming educators.


I also have been looking for a way to show parents in my district what their children have been working on as the school year progresses, and this feels like a great way to achieve that. I teach Pre-K - 4th grade and have many talented, hard working students. I know this will be some extra work but it will SO be worth it! they make artwork that is creative and inspired. I want to highlight their efforts!

What makes this art ed blog different?
Art is all about originality, and here you'll find art projects and resources that are just that. Over the years I've made up some lessons that have been a lot of fun for students and taught concepts in unique, interesting ways. My projects tend to be student led and interdisciplinary, and I'm always encouraging students to think harder and dig deeper when faced with a problem to solve.

What's with the name?
I was trying to think of something cute with the name. Keyword is trying.

That's all for now! Enjoy!